Tuesday, August 23, 2011

Owl Themed Baby Shower. Putting it all together!

Pin It

Well hey, girl, hey!  Heeyyyyyy!

So. I'm hoping you've seen the bunches of post I've done leading up to this one, showing you parts and pieces of this shower.  No worries if you haven't, we'll go over them again.  Luckies!

So let's talk Owl Themed Baby Showers.  They're hip.  The big thing these days. We picked this for Leah because it's a gender neutral theme and she and I had picked out some fabric for the nursery with owls.  So, there you have it, a theme was born.

The first thing I was all over was the tabelscape to be used for desserts.  No really, like I was emailing the Moms the very first day telling them all about my ideas.  I'm assuming it got pretty annoying, but I'm a passionate gal, ok?  Ok.

I started by gathering plates to make dessert tiers.
I found these on a business trip to Wegman's in upstate NY.

Just stack and super glue.  DONE.
Then I made some yarn balls and apple sticks for vases.  The yarn balls are only little sytro balls wrapped in yarn and then stuck on a skewer stick.  Easy but seriously cute! This is how I made the apples--pretty much the same thing!

Dollar Tree Apples.  Skewer Sticks.  Stick and place!


Pretty!
And then of course I had to mock it up:
I used skinny bamboo sticks for the background--from the $ Tree as well!
Ah yes, and now for real life.  Here it is!
Check out how well the bakery did at matching the cake to the invite!  AMAZING.

Seriously, dead on.

Leah's MIL Jean made the invites (she's a cricut nut) and owl picks.

Note to self--straight on shots in this dress?  BAD IDEA!  
Here another look at the Mini Diaper Cakes Centerpieces too!  

how cute is that little stamp!  That's all Jean, Leah's MIL!


Finally, a few repeats from my other posts:

Couture travel wipes clutch.  Tutorial here.
 Custom onesies using the Sily and Freezer Paper.  Tutorial here.

 Baby Shower Door Prizes.  Lots of tutorials here.
 Sweet little infant hats using a knitting loom.  Tutorial here.
 The handmade baby banner!  Tutorial here.

And the sweet Mama herself, Leah! 
Can't wait till baby Wiggles arrives!  I hope you enjoyed your shower :-)

Big (Owl Themed) Smile,

So damn happy! So thank you. :)

Hi Darlings!

I tell you what, it's been a good day for B.Cheniful!  I reached over 250 Facebook followers as well as 2 Tip Junkie features in a row (here and here)!  I'm just so damn happy!  You know that quote:
"I just want to make pretty things, even if nobody cares." But you know what?  It's so awesome when they do!

Thank you all for caring!  :-)

Big (they really like me!) Smile,

Monday, August 22, 2011

How to add a signature to your blog.

Oh Heyyyyy! 

So, if you're anything like me you likely have some form of "blog envy".  You know, all those fancy blogs with fancy buttons and fancy dropdown menus and FANCY signatures?  Like, wait, I want one too!  I mean, maybe you want all of it, (um, me too) but I only have the signature to show today. 

Oh, and btdub, I'm not really going to show you how, but this site will

I followed the step-by-stop directions, and see?  I have a signature now, too!

Big (fancy signature) Smile,

Friday, August 19, 2011

Handmade Baby Shower Banner

homemade crafts
Pin It

Oh hey.  Wanna see something so cute that I could about die?!?  You do?  Perfect! 

It's a B.Cheniful Original and everything!  (ok, when I say original, I only mean original to me, CLEARLY someone out there has done this.  But mine's cuter, okay!?!)

So this goes along with the Owl Theme Baby Shower (click here, here, and here for more awesomeness). 

I made (handmade, btdub) this "Welcome Baby Rau" banner for the shower.  Rau is their last name, not the baby's first name.  We don't know the name, cause it's a surprise!  Yo, I'm such a brat!  Sorry Leah!!!!  It's only because I want to be making gender specific things right. this. minute.

Chenyways, howsabouts I just show you this bad dad, huh?  Ok then.

So I used my Sily (silhouette machine) to make stencils that I traced onto the fabric.  I traced it on the back of the fabric so I wouldn't have to worry about any pen marks.  Unfortunately, someone forgot to reverse the fonts and had to start all over.  On the face of the fabric.  Ah yes, my impatience bites me in the ass once again! 


Then I cut all the letters out--FINALLY.


Next I hand-stitched the letter on to felt, stuffing them with that stuffing stuff.  you know what I'm talking about right?  batting?  Man, I have got to brush up on my craft terms--how will anyone take me seriously?!?!  :-)

So yeah, batting.  Stuffed it.  And I did that with every. letter.  
I added buttons to the a's/b's/o's etc.  Finally I laid out the words as I wanted and then glued a ribbon behind.  Nothing fancy.  A little hot glue, a few corona lights, it was all good.


Here's the final!


See, look at that!  Okay, so maybe I'm a little too excited about muppet letters and whatnot, but man, I put some LOVE into that banner.  You'd think I was birthing this child!  

I'm not.

Big (Tah Freaking Dah!) Smile,
B.Chen


all crafts Homemade Projects ~ Add Yours {8/16}

Saturday, August 13, 2011

Baby Shower Prizes

homemade craftsPin It

Leah's MIL and I decided that baby shower games are silly.  No offense to those to love them, they just aren't for us.  So we decided that they weren't for Leah, either.  ;-)  BUT, to make up for the games, we still gave away prizes--just for being awesome.  :-)  Or because Leah pulled your thank you card envelop from a basket. Whatev--you won, didn't you!?!

Here are some things I whipped up for our lucky guests!
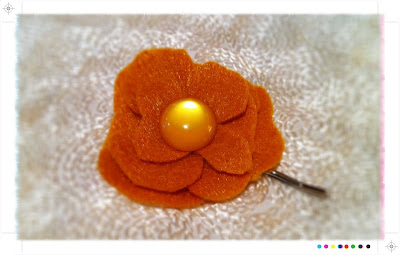
felt flower clippy thing.  It reminds me of fall....
another felt flower of sorts.  

1 earthified wreath (matches the theme, you see?)
Do you know how to make this felt flower?  It's WAY easy!  Check out the how-to over at Mrs. Priss!
6 sets of flower push pins

Straight up, I glued these hobby lobby flower things (seen here once upon a time) to push pins.  Done.
4 sets of coasters and 2 sets of magnets
The magnets?  Another easy guy--here's a tutorial from Creations by Kara.  Now, I only used Mod Podge as my adhesive--cause I take the easy way, friends--she uses super glue and whatnot.  Up to you!

Here's a pretty ugly tutorial for the coasters.  I don't know what I was thinking when I took these photos--they're worse than usual!
see what I mean?  Ew.
About the coasters.  I bought some super ugly coasters a Michael's for like negative $1.  Figuring they could be a perfect shower gift, I decided to B.Chenify them.
  1. Scrapbook paper.  Whatever you like.  You could even use a note to your bestie you wrote in 8th grade--Use whatever you like!  Then trace the coaster on the back side of said whatever paper.  Cut out your shape.  
  2. I'm missing the step before this picture....Spread Mod Podge on the face of the coaster, then apply the paper over the mod podge--print side up.  Finally, following the photo above, spread mod podge on the top of your coaster.
  3. Walk away and let it dry.
  4. My coasters were pretty tacky-feeling even after a few WEEKS of drying, so I took to Facebook and listened to the advice of the Mod Podge Goddess, Amy, of Mod Podge Rocks!  Answer?  Clear acrylic sealer!  Done and Done.

anyone had problems with mod podge being sticky even after days of drying? I have this issue when I use it with paper.....
July 9 at 4:18pm ·  · 

    • Mod Podge Rocks! Hey B.! It depends on the climate you are in - but yes, this is a common problem. The solution is to spray on a clear acrylic sealer in your choice of finish. The great side benefit is that it makes the project extra durable! :D
      July 9 at 4:27pm · 

    • B.Cheniful Awesome! Thanks so much for the tip!
      July 10 at 8:09pm · 

That trick totally helped!  I after they dried--again--for a few days, I was able to stack them without all coaster sticking to each other!  

Pin It

So there you have it--the gifts that keep on giving.  Or something like that....

Big (Games are dumb but gifts are cool) Smile,
B.Chen

custom onesies--the freezer paper way.

Pin It

homemade craftsOh hey guuuuurrrrrrrls.  I'm sooo ghets!  :)

Ready for MORE baby shower goodness?  Perfect, cause that's what I've got for you. LOTS of it.

This time we're talking about custom onesies using the Sily and Freezer Paper.  Have you ever done freezer paper stenciling?  I'd been reading about it forevs, but because it requires tracing and cutting if you don't have your own Sily (Which I didn't...until last week!) I just couldn't get behind it.  Chenyways, once the Sily arrived, I decided to give it a shot!  I learned myself here.  How much are you LOVING my vocab today?  Not at all?  Bums!  :)

For the baby shower I wanted to make some cute and FUNNY onesies.  I think I worked it out.

Here's how I made the first one--MichiGANGSTA!


  1. Well first I made this snazzy design on the Sily.  
  2. Then I put down freezer paper on the sticky mat shiny side down and hit the cut button.  Next you place it shiny side down on your onesie and iron.  I used the cotton setting and it worked fine.  
  3. Now it's time to paint.  Make sure you're using fabric paint, not acrylic or like finger paint or something.  
  4. Using a foam brush, blot your way to brilliance!  If you're switching up colors--like I did above--make sure you have a skinny brush or even q-tip so you don't mix the colors.
  5. Let it dry--I craft at night, so I just waited until morning to peel off the freezer paper.  
  6. Finally, you'll want to place a fabric over the stencil  and iron again to set the design completely.  And now the baby is ready to ROCK!
In case you're wondering the meaning behind any of these--I mean clearly you're dying to know--here it is.
  • Michigangsta--um, because it's effing hilarious.  And we live in Michigan.  And it's HILARIOUS!
  • Big Head Giraffe--it's whimsy and stupid cute.  AND, again, cause we don't know the sex of the baby, this works well.
  • Hi.  I'm Wiggles--that's what they call the baby.  I think it's a good intro, right?
  • All my clothes are green and yellow because my parents "like surprises". Pretty obvious here I'm making fun of my best friend.  I'm so sweet it hurts.
I think she liked them!
Success!

So I LOVE making these now so much--can't wait to make my own!  Oh, and some for J Chen.  He's my little t-shirt guy.

Big (funny onesie) Smile,
B.Chen


Mini Diaper Cakes and a Wipes Clutch.

homemade craftsSo Leah's baby shower has come and gone, so now it's finally time to share all fun stuff I made for her big day.

And PS, this was a gender neutral shower.  With an Owl theme.

First up, Mini Diaper Cakes.

I really like diaper cakes.  I've always found them to be pretty fascinating and the people who make them, well, brilliant.  I, on the other hand, took the easy way out :)  I kept trying to figure out what I wanted the centerpieces to be.  I'm all about form meets function.  I mean, flowers are super pretty, but they die.  And then you throw them out.  Or, if you're me, you leave them in the vase for 3 weeks and let mold form around the stems.  Remember, this is a judge-free zone. :)  Chenyways, I decided I should do diaper cakes. Mini Diaper Cakes--for 6 tables--this way Leah could actually use her centerpieces. For the baby's butt.

Right or wrong, this is how I did it.

Ingredient List:

  • A pack of diapers--I did newborn, about 50 or so... 
  • Rubberbands.  Skinny ones for the diapers.  Fat ones to hold them together.
  • A center structure.  I used these bamboo pencil cups from the $ Tree--but you could easily use a tin can.  *also--you could just use like 3 or 4 more diapers instead of a structure.  I had just already purchased these pencil cups for another idea I had that fell flat and I didn't want to waste them.
  • Jute.  This is optional--you could use ribbon, or whatever you think of to hide the outer rubber band.
  • Paper fillers.  Again, optional.  This is used to cover the top of the cake--you could do some fabric rosettes!


1.  The ingredient list at large.  Well ok, it's missing the paper fillers.  We could have real problems.
2.  So take your diapers and roll them up tight--secure with skinny rubber bands.  I needed like 7 or 8 for my mini cakes, but it will all depend on your center structure and how fat or skinny it is.  You'll know the right amount when you can lift it up by the center and everything comes up with you.  

3.  Wrap your Jute--or whatever rubber band hider you've come up with--around the center of the cake as many times as necessary to achieve the look you want.  
4.  You know, like that picture.  

Pin It

And finally....this is where you add your embellishments if you will (and I think you will).  I used the paper fillers to cover up the top of the center structure and then added this little felt owl to the front.  Ya know, cause it was an owl theme shower!  I used the jute on the wings to tie it all together.  
And, what goes better with diapers than wipes?!?!  I would think vodka, but that just shows how much I know.....

I made this pretty thang using a tutorial from Homemade by Jill.  My wipes case was a little bigger than the template, so I just cut out the fabric a little bigger.

I ended up adding a snap to this--which it doesn't call for--cause I'm pretty sure that I melted the case's snap with my glue gun.  Listen, it's not my fault that J Chen couldn't man up and finish his strawberry daiquiri--what was I supposed to do, not drink it?!?! PLEASE.  So yeah, that was likely a intoxicated human error.  :)  But isn't pretty?!?!??!  

Pin It


I made it especially in that fabric to match the KATE SPADE bag I got her!  Listen, there is no way my girl is gonna be running around MP with a freaking Winne the Pooh diaper bag, ok?  Ok.  And no, it's not a knock off, and yes, Leah I will be expecting one in return.  ;-)


l think the two will be very happy with one another!  The baby and Leah of course! Not the Kate/Clutch combo ;-)

Oh, and because I didn't know where else to put this, I wanted to show you these little hats I made her.
Clearly the rosette is detachable!  No wishful thinking over here.  NEVER.  
I made these using a knitting loom.  You know, for kids.  J/K, lots of adult wannabe knitters use them. Wanna give it a whirl?  Check out how sweet, fast and EASY these little hats are with this tutorial!

Pin It

Big (who needs a REAL diaper bag) Smile,
B.Chen

all crafts Homemade Projects ~ Add Yours {8/16}